
■基礎編
1.はじめに
2.構成説明
3.基本Configを入れてみよう
4.ステータスを確認しよう
■アレンジ編
5.as-pathfilterを入れよう
6.prefix-listを使おう
7.Configをグループ化
8.LocalPreference値で経路制御してみよう
9.VRRP Trackingを組み合わせよう
10.MED値でお願いしてみよう
11.NATを併用してみよう
■再配送
12.Staticを再配布しよう
13.BGPをOSPFに再配布しよう
14.OSPFをBGPに再配布しよう
#####################################################
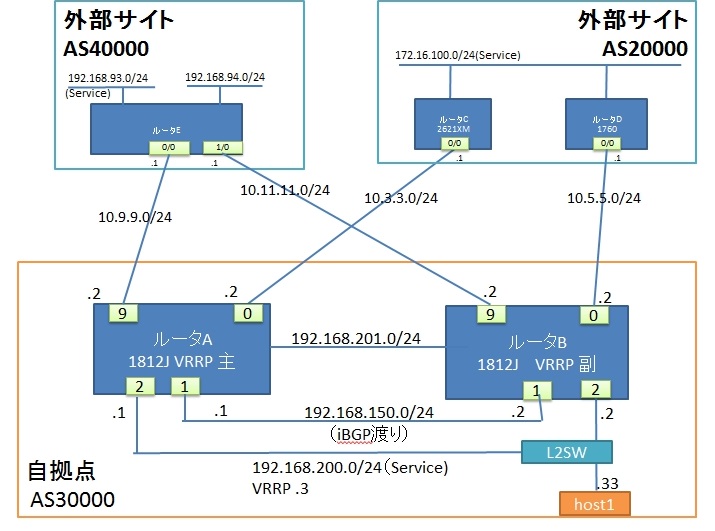
今回の基本構成(おらさい)

重み付けにはweight値を採用。デフォルトが100なのでルータBのiBGP迂回経路を200にする。(なぜここだけ200にするかはパート2参照)

前回Configを入れた状態で一度ステータスを確認致します。BGPとルーティングに係るステータスコマンドは下記の通り。
■show ip bgp neighbors | include BGP
1812J-A#
1812J-A#
1812J-A#show ip bgp neighbors | include BGP
BGP neighbor is 10.3.3.1,  remote AS 20000, external link
  BGP version 4, remote router ID 172.16.100.1
  BGP state = Established, up for 12:54:35
  BGP table version 39, neighbor version 39/0
BGP neighbor is 192.168.150.2,  remote AS 30000, internal link
  BGP version 4, remote router ID 192.168.201.11
  BGP state = Established, up for 12:54:35
  BGP table version 39, neighbor version 39/0
1812J-A#
1812J-A#
1812J-B#
1812J-B#
1812J-B#show ip bgp neighbors | include BGP
BGP neighbor is 10.5.5.1,  remote AS 20000, external link
  BGP version 4, remote router ID 172.16.100.2
  BGP state = Established, up for 00:12:57
  BGP table version 68, neighbor version 68/0
BGP neighbor is 192.168.150.1,  remote AS 30000, internal link
  BGP version 4, remote router ID 192.168.201.1
  BGP state = Established, up for 12:55:06
  BGP table version 68, neighbor version 68/0
1812J-B#
1812J-B#
1812J-B#
内部、外部両方のネイバーが”BGP state = Established”になっていることを確認。OSPFのFullにあたる。

※追記 →includeが抜けてますね。
■show ip bgp
1812J-A#
1812J-A#
1812J-A#show ip bgp
※省略
   Network          Next Hop            Metric LocPrf Weight Path
*> 172.16.100.0/24  10.3.3.1                 0             0 20000 i
* i192.168.200.0    192.168.150.2            0    100      0 i
*>                  0.0.0.0                  0         32768 i
1812J-A#
1812J-A#
1812J-A#
1812J-B#
1812J-B#show ip bgp
※省略
   Network          Next Hop            Metric LocPrf Weight Path
*  172.16.100.0/24  10.5.5.1                 0             0 20000 i
*>i                 192.168.150.1            0    100    200 20000 i
*> 192.168.200.0    0.0.0.0                  0         32768 i
* i                 192.168.150.1            0    100    200 i
1812J-B#
1812J-B#
重要。複数の経路を持っている場合、”>”ベストパス印がついているルートがルーティングテーブルに採用される。Next-hopがどこに向いているかを確認。1号機ならWAN側、2号機ならLAN側の対向IPがNext-hopになっている方に”>”がつくこと。(見づらくてすみません、ソースを表示ボタンを活用ください)

■show ip bgp summary
1812J-A#show ip bgp summary
※省略
Neighbor        V           AS MsgRcvd MsgSent   TblVer  InQ OutQ Up/Down  State/PfxRcd
10.3.3.1        4        20000     127     135        5    0    0 00:20:27        1
192.168.150.2   4        30000     122     132        5    0    0 00:20:17        1
1812J-A#
1812J-A#
1812J-B#show ip bgp summary
※省略
Neighbor        V          AS MsgRcvd MsgSent   TblVer  InQ OutQ Up/Down  State/PfxRcd
10.5.5.1        4      20000     483     472        5    0    0 00:20:29        1
192.168.150.1   4      30000   17916   16615        5    0    0 00:20:33        2
1812J-B#
1812J-B#
経過時間のカウントがあり、Stateに何も表示されていないこと。
■show ip route
1812J-A#
1812J-A#show ip route
※省略
      10.0.0.0/8 is variably subnetted, 2 subnets, 2 masks
C        10.3.3.0/24 is directly connected, FastEthernet0
L        10.3.3.2/32 is directly connected, FastEthernet0
      172.16.0.0/24 is subnetted, 1 subnets
B        172.16.100.0 [20/0] via 10.3.3.1, 00:22:08
      192.168.150.0/24 is variably subnetted, 2 subnets, 2 masks
C        192.168.150.0/24 is directly connected, FastEthernet1
L        192.168.150.1/32 is directly connected, FastEthernet1
      192.168.200.0/24 is variably subnetted, 2 subnets, 2 masks
C        192.168.200.0/24 is directly connected, Vlan200
L        192.168.200.1/32 is directly connected, Vlan200
1812J-A#
1812J-B#show ip route
※省略
C    192.168.150.0/24 is directly connected, FastEthernet1
     172.16.0.0/24 is subnetted, 1 subnets
B       172.16.100.0 [200/0] via 192.168.150.1, 00:22:05
C    192.168.200.0/24 is directly connected, Vlan200
     10.0.0.0/24 is subnetted, 1 subnets
C       10.5.5.0 is directly connected, FastEthernet0
1812J-B#
1号機・・AD値に従いWAN(外部)側経路をルーティングテーブルに採用
(8行目 172.16.100.0 [20/0] via 10.3.3.1, 00:22:08)
2号機・・weight値に従いLAN(内部)側経路をルーティングテーブルに採用
(23行目 172.16.100.0 [200/0] via 192.168.150.1, 00:22:05)
ひとまず基本的な接続はこれでOK。次からは実務面で必須になる機能を紹介していきます。
——————————————————————–
★★ PR ★★★
可愛い僕のお嫁さん2( ^ω^)

株式会社ファイバーネットワーク
——————————————————————–


